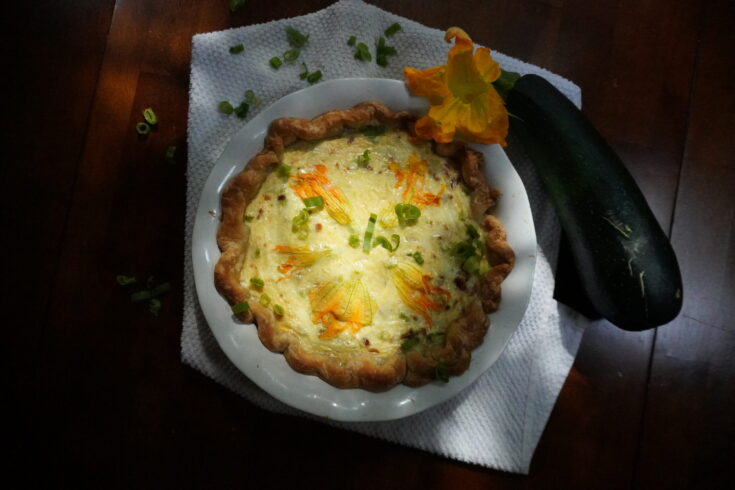
How to Make the Best Summer Quiche
Summer quiche is packed with flavor from peak-of-season zucchini and delicious bacon. This beautiful recipe uses a sourdough pie crust and is topped with squash blossoms to make the perfect summertime treat.

My best friend, Kristi, has a beautiful, lush garden full of sunflowers, peas, potatoes, and zucchini. She likes to give me what she’s grown, and I’ll turn around and give her something delicious that I made with it. It’s the perfect balance. She blesses me. I bless her.
Seeing the flourishing zucchini flowers decorating her backyard with little pops of yellow inspired this unique yet simple summer quiche. If you don’t have access to a garden with zucchini growing in it, squash blossoms can often be found at your local farmer’s market. But don’t let it keep you from making this if you can’t find the flowers.
Hold on. You’re saying the flowers from the zucchini plant are edible?
They sure are! There are tons of ways to prepare and eat them, and cultures from around the world make use of the delicate, yellow petals that add a subtle floral flavor to any dish. Italians love to stuff the blossoms with mozzarella and deep fry them. Mexicans will put them in a quesadilla with Oaxaca cheese. And I’m sure that’s just the tip of the iceberg. Here are 8 different ways to use squash blossoms in your cooking!
They’re also a great source of vitamins and minerals! They are high in calcium and iron and especially high in vitamins C and A. So not only do squash blossoms add flavor and a wow factor to the dish, but they’re super healthy too!

Why you’ll love this Summer quiche
- Delicious: Need I say more? The bacon brings a salty meatiness that perfectly balances the delicate flavor of the zucchini, and the onions cut through the creaminess of the white cheddar with a sharpness that rounds out every bite. And the flaky, buttery sourdough pie crust that holds it all together simultaneously crunches and melts in your mouth.
- Light but filling: I found that one slice was enough to satiate my taste buds and my stomach without feeling like I ate something overly salty, creamy, or buttery. The flavors are well balanced, and the caloric density is just the right amount to fill you up without feeling too full.
- Make ahead: Quiche is amazing because you can eat it fresh out of the oven (after it cools for a few minutes, of course), or you can make it the day before and serve it cold for brunch. It also rewarms beautifully in the oven. I love to use this as a meal prep item as well. It’s so versatile to any schedule and need!
THIS POST CONTAINS AFFILIATE LINKS WHICH MEANS I MAKE A SMALL COMMISSION AT NO EXTRA COST TO YOU. SEE MY FULL DISCLOSURE HERE.
Supplies you may need
A quiche is traditionally served as a pie, so a pie plate is a necessity. I also used a rolling pin when I was preparing my dough. The pie crust needs to be parbaked, and that requires something to weigh it down while it’s in the oven. I used pie weights in parchment paper, but I’ve also used dried beans in the past.
My preferred method of cooking bacon for this is in the oven, so in that case you’ll also need a sheet pan. And I grated my own cheese for this quiche which requires a cheese grater.
- Pie plate
- Rolling pin
- Pie weights
- Parchment paper
- Sheet pan
- Cheese grater
Making this Summer Quiche
There are few steps to this process, but the best part is it can be broken up to fit any schedule. I have made the pie crust one day, made the bacon another, and made the quiche on a completely different day. I’m a big fan of breaking up different parts of preparation for a meal to make it as easy as possible.
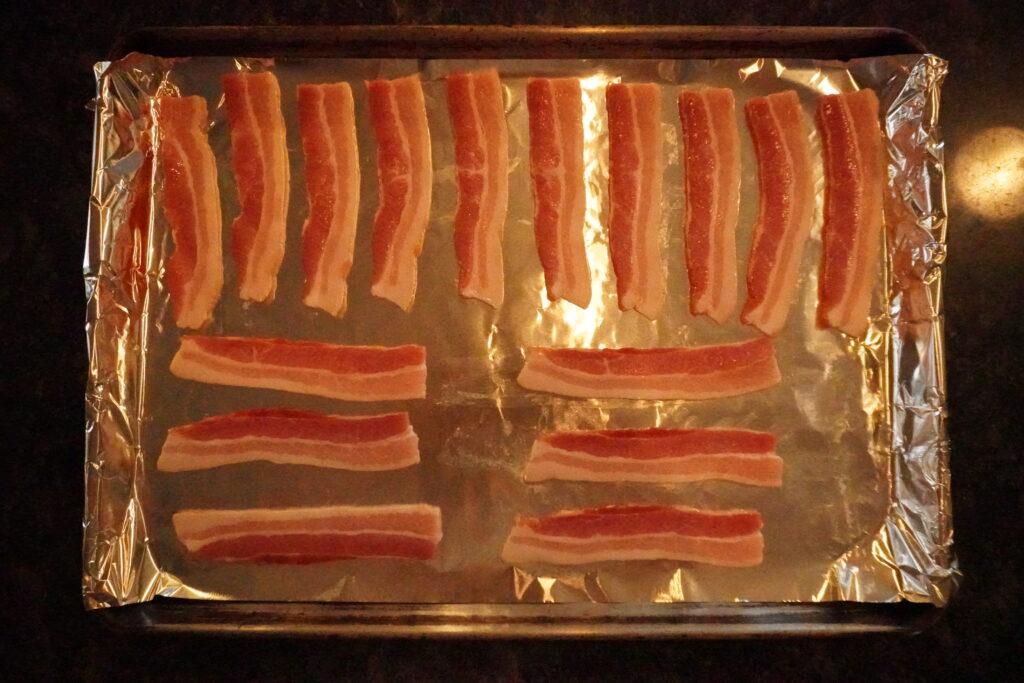
Cook the bacon
This recipe calls for crumbled bacon, so the very first thing I like to do is get that cooked and ready to use. My preferred method is baking it in the oven. I like to line a baking sheet with aluminum foil, and lay the bacon right on top. Every oven is a little different, but I find the best results for crumbly bacon is putting the pan into a cold oven, set it to 400F/200C, and let it come to temperature with the bacon already in there. From start to finish, I find that it takes just around 30 minutes including the preheating time. I like to just throw the bacon in the oven, set the temperature, and set the timer all at the same time. After a half hour it comes out looking perfect.

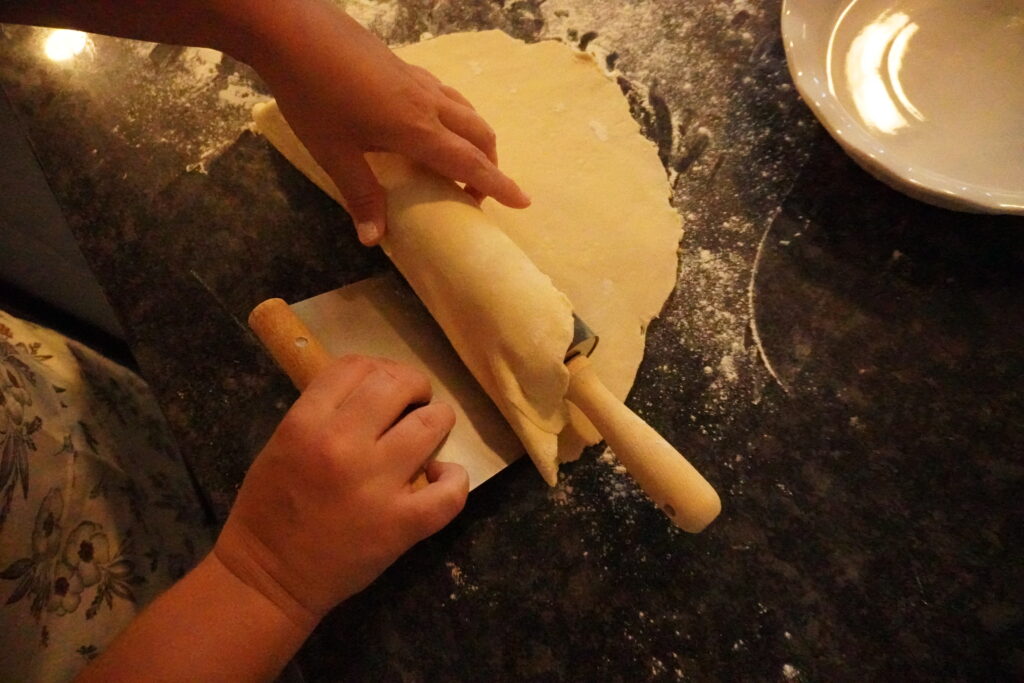
Roll and shape the pie crust
Next let’s shape the pie crust. I used my sourdough pie crust recipe, but a store bought one works just fine here too. I like to dust my work surface as well as the dough itself to keep it from sticking to the pin when I roll it out.

I know I’m done rolling out the dough when the pie crust is a little wider than the edges of the pie plate. Sometimes I even hold the pie plate over the rolled out dough just to make sure it’s wide enough all around.

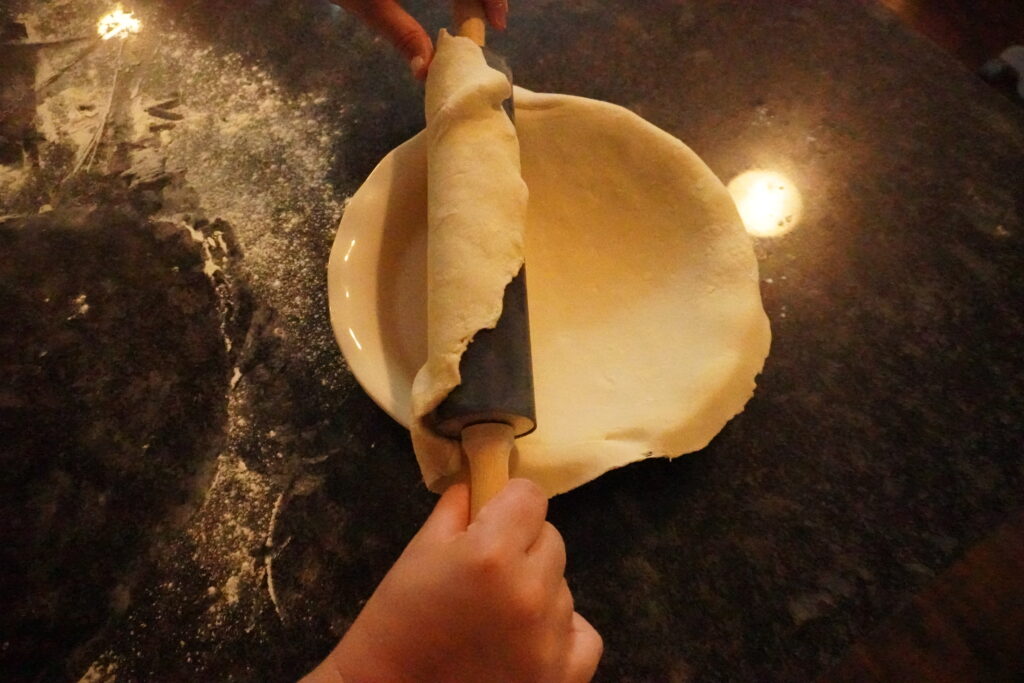
A trick I like to use to get the pie crust off the counter and onto the pie plate is to roll it up onto the rolling pin. If the dough is a bit sticky, using a bench scraper helps make sure it stays intact.
Then I will slowly and carefully unfurl the pie dough onto the plate.
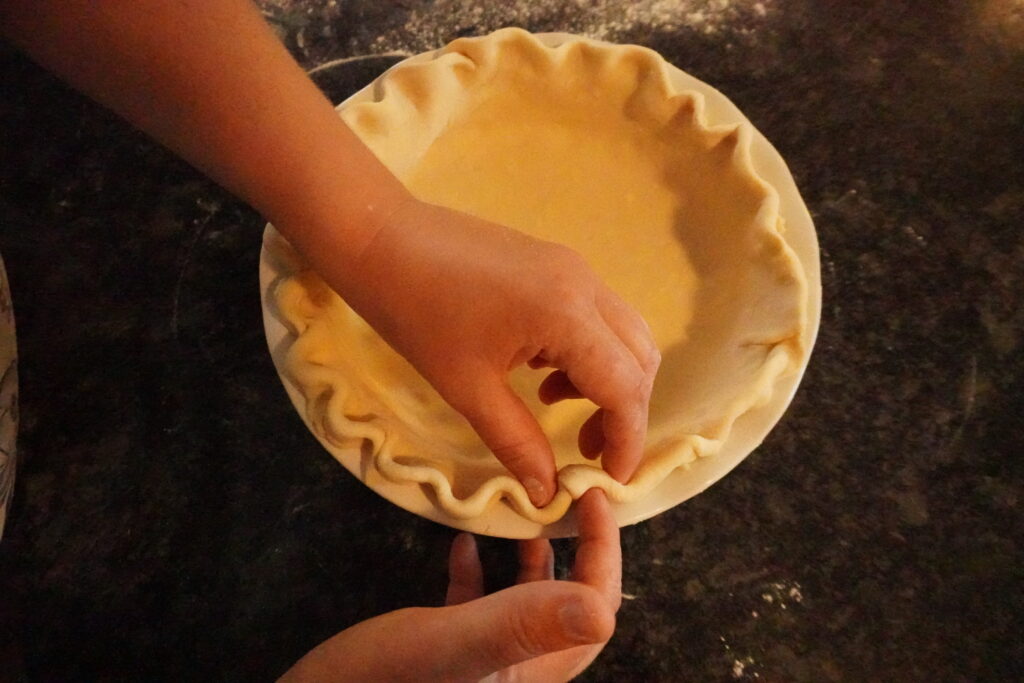
Shaping the crust is my favorite part. I will gently press the dough down into the plate so the bottom is shaped against the pan, and then I move onto the outside. I like to fold any excess hanging dough under itself, and, using my fingers, I’ll go around the circumference and press the edges. This doesn’t have to be meticulous or fancy. However it looks and whatever way you use, just do your best to crimp the edges.
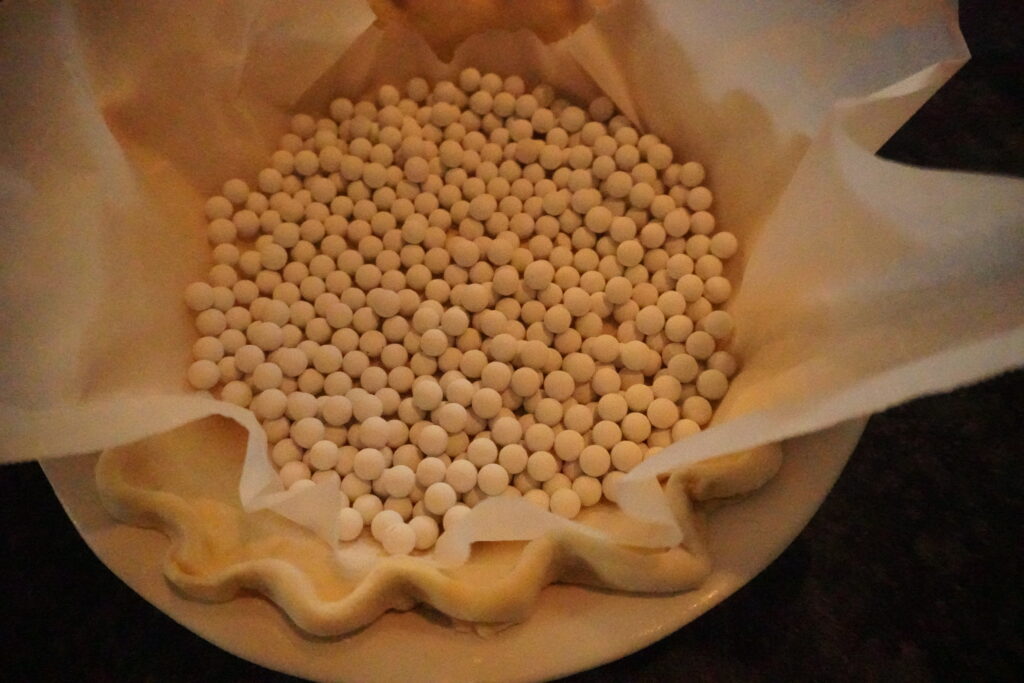
Blind bake the crust
For this recipe, the pie crust really needs to be parbaked. To do this, line the dough with parchment paper then fill with the pie weights (dried beans will work here too). Bake like this for 15 minutes.
Prepare the Summer quiche filling
After 15 minutes at 375F/190C, pull the crust out of the oven and remove the parchment paper and pie weights. Prick the bottom of the crust all over with a fork to prevent it from puffing up. This is called docking the pie crust. After docking, put it back in the oven (this time just the crust and without the pie weights) for another 7 minutes.

While the crust blind bakes, I like to prepare my filling. The zucchini and the cheese need to be shredded, the onion needs to be minced, and the milk and heavy cream need to be poured and measured. After everything is thoroughly mixed and poured into the parbaked crust, the quiche goes back into the oven at 350F/180C for 25 minutes.
Garnish and finish baking
After 25 minutes, I like to add the garnishes of the squash blossoms and a little extra shredded cheese. Before adding the flowers, make sure to remove the green spike-looking pieces toward the bottom. I believe these are called the sepals, and removing them is optional. I personally think the texture in the finished product is better without them.

After another 25 minutes in the oven, pull out the quiche, garnish with some green onion, and let it rest for at least 10 minutes before digging in.
How to Make the Best Summer Quiche
Summer quiche is filled with peak-of-season zucchini and delicious bacon and topped with squash blossoms for the perfect summertime treat.
Ingredients
- 1 sourdough pie crust
- 4 eggs
- 1/2 cup whole milk
- 1/2 cup heavy cream
- 1 cup shredded white cheddar cheese
- 1 cup crumbled bacon
- 1 cup shredded zucchini
- 1/2 cup green or red onion
- pinch of salt and pepper
- 4-6 squash blossoms
- extra shredded white cheddar and green onions for garnish
Instructions
- If using sourdough pie crust, prepare dough ahead of time.
- Line a baking sheet with aluminum foil and lay the bacon flat.
- Put into the oven and preheat to 400F/200C.
- Set the timer for 30 minutes.
- After a half hour remove bacon and transfer to a paper towel lined plate to cool enough to handle.
- Crumble into bits. Set aside.
- Preheat oven to 375F/190C.
- Roll out pie dough to be between 1/2 to 1 inch wider than the circumference of your pie plate. Flour your work surface, rolling pin, and pie dough as needed to keep anything from sticking.
- Transfer dough onto pie plate. See the easy and quick technique above using the rolling pin.
- Press dough into the bottom of the pie plate and crimp the edges.
- Line the pie crust with parchment paper, and fill with pie weights.
- Bake for 15 minutes.
- After 15 minutes, take crust out and remove parchment and pie weights.
- Dock the bottom of the crust and bake for another 7 minutes.
- Preheat oven to 350F/180C.
- Mix filling thoroughly and pour evenly into the parbaked crust. Use a fork to distribute filling in the crust if needed.
- Bake for 25 minutes.
- Remove from oven and top with squash blossoms and a little extra shredded white cheddar.
- Bake for another 25 minutes.
- Let cool for at least 10 minutes. Garnish with green onions and serve.
Notes
Make ahead: This makes a great meal prep item. Make it a day or two before and either serve cold or reheat in a 350F/175C oven for 15 to 20 minutes.
Freeze: This also freezes exceptionally well. After letting it cool completely, I like to wrap it twice with plastic wrap and then cover it with foil. Write the date it was made and freeze up to 3 months. When you want to eat it, just let it thaw in the fridge overnight and reheat as previously mentioned.
Variations: Make this completely your own. Use 4 eggs and 1/2 cup of whole milk with 1/2 cup of heavy cream as your base then add whatever protein and veggies you prefer. Just keep in mind that sticking with the same measurements will ensure your pie doesn't overflow from the crust.
Nutrition Information:
Yield:
8Serving Size:
1 sliceAmount Per Serving: Calories: 424Total Fat: 28.4gNet Carbohydrates: 26.1gProtein: 14g
Nutrition information is estimated.
Did you make this recipe? Comment below and let me know your thoughts and if you tried any other variations!
Haven’t tried it out yet? Pin the image below to save for later.